VoltTest Cloud Closed Beta Is Now Open: How to Get Access

We're opening up access to VoltTest Cloud — the managed platform for running large-scale load tests without provisioning a single server. Until now, cloud mode has been limited to a small group of early testers. Starting today, anyone can join the waitlist, and we're approving access in waves.
This post covers what VoltTest Cloud is, what you get in the closed beta, and exactly how the access process works from waitlist to your first cloud test run.
What Is VoltTest Cloud?
If you've used the VoltTest PHP SDK, you know the workflow: define scenarios in plain PHP, run them on the high-performance Go engine, and read real percentile metrics. That works great from your own machine — up to a point.
Generating serious load from a laptop or a single CI runner hits hard limits: open file descriptors, bandwidth, CPU. VoltTest Cloud removes that ceiling. Your test definition stays exactly the same — one line switches execution to managed infrastructure:
<?php
use VoltTest\VoltTest;

$test = new VoltTest('Checkout Flow Load Test');
$test->target('https://staging.example.com');
$test->cloud('vt_your_api_key'); // ← runs on VoltTest Cloud instead of locally
$test->setVirtualUsers(500);
$test->setDuration('5m');
Using the Laravel package? It's just as simple — add your API key to .env and pass a flag:
php artisan volttest:run CheckoutTest --cloud
Or enable it globally with VOLTTEST_CLOUD_ENABLED=true in your config/volttest.php — the Cloud Execution docs cover all the options.
Either way, the test executes on dedicated cloud instances, and results — requests per second, P95/P99 latency, error breakdowns, time-series charts — land in your VoltTest dashboard, stored and comparable across runs.
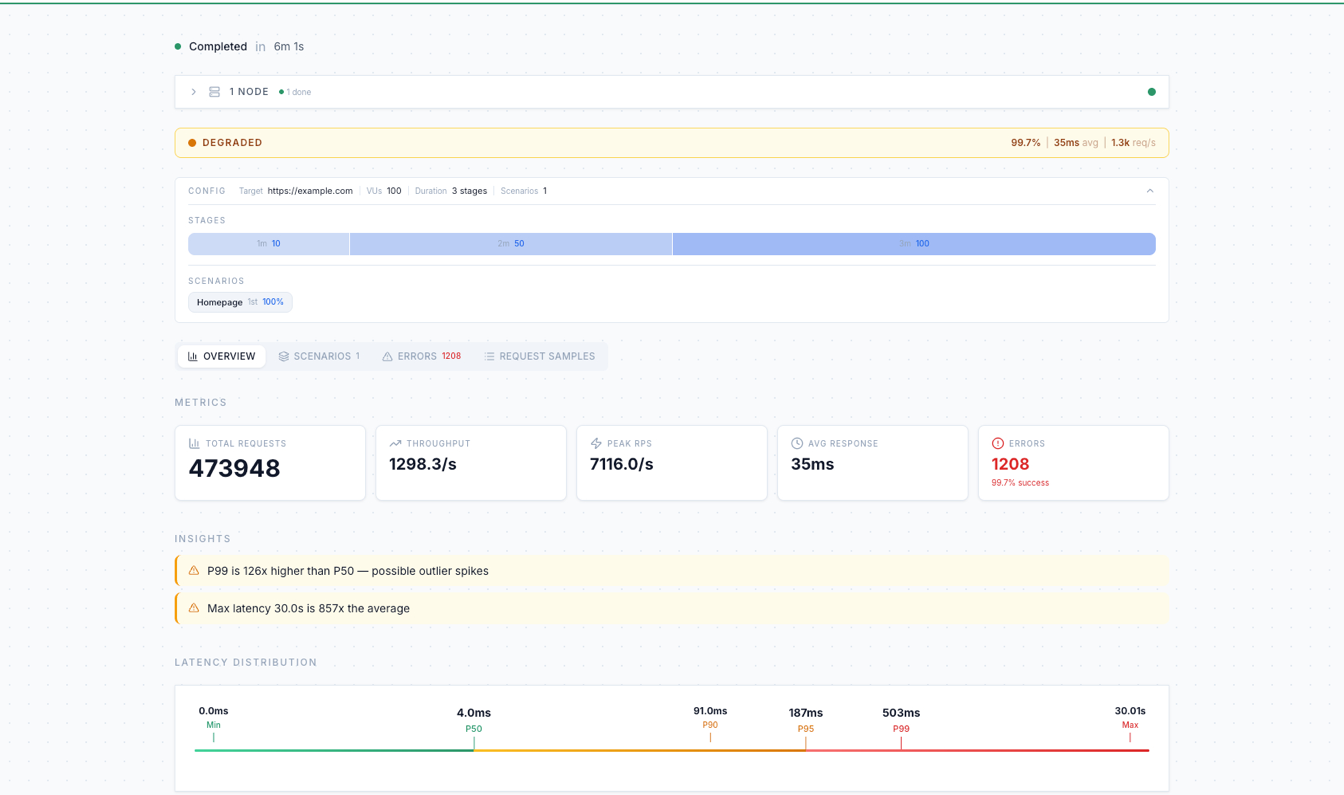
This run is a good example of why you load test in the first place: averages look healthy (35ms), but VoltTest's insights immediately flag that P99 is 126× higher than P50 — a tail-latency problem a quick manual check would never catch.
What's Included in the Closed Beta
Every beta account starts on the free plan:
| Free (Beta) | |
|---|---|
| Max virtual users per test | 500 |
| Max test duration | 10 minutes |
Everything else comes with the account: the full dashboard with metrics and run history, run comparison (up to 5 runs side-by-side), and the PHP SDK & Laravel integrations.
500 VUs for 10 minutes is enough to find real bottlenecks in most staging environments — connection pool exhaustion, N+1 queries under concurrency, and tail-latency spikes all show up well before that. We're finalizing paid tiers with higher limits during the beta — early users get a say in how they're shaped.
If the free limits are holding you back, reach out at hello@volt-test.com — we're happy to upgrade serious beta testers to a higher package while pricing is being finalized. Tell us what you're testing and the load you need.
How to Get Access
We're keeping the beta closed — access is granted in waves — but the door is now open for everyone to request it. Here's the full journey:
1. Create Your Account
Sign up at volt-test.com/register — registering is how you join the waitlist. It's free, with no credit card and no commitment, and your account is already set up for the moment you're approved.
Join Early Access
Sign up to join the waitlist. We review and approve access in waves.
2. Verify Your Email
Right after signing up, we'll send a 6-digit verification code to your inbox. Enter it and your account is active — you'll land on a "You're on the waitlist" screen while your access is being reviewed.
3. Get Approved
We review the waitlist and approve access in waves. When it's your turn, you'll get an email — and if you're signed in, the waitlist screen notices your approval and takes you straight to the dashboard, no re-registering or refreshing needed.
We're prioritizing teams actively load testing PHP and Laravel applications — if that's you, an email to hello@volt-test.com with a line about your use case helps us bump you up the queue.
4. Run Your First Cloud Test
First, grab an API key: from the dashboard, open Settings → API Keys, click Create API Key, and give it a name (you can set an expiration, or leave it permanent). Copy the generated key — it starts with vt_ and is shown only once, so store it somewhere safe. Then point your existing test at the cloud.
With the PHP SDK:
$test->cloud('vt_your_api_key');
With the Laravel package, add VOLTTEST_API_KEY=vt_your_api_key to .env and run:
php artisan volttest:run YourTest --cloud
Run it the same way you always do — the SDK handles the rest, and your results appear in the dashboard in real time. The Cloud Mode guide (or Cloud Execution for Laravel) walks through the full setup.
Why a Closed Beta?
We'd rather grow deliberately than fall over publicly. A load testing platform has an unusual property: our users' job is to generate enormous amounts of traffic. Opening access in waves lets us watch capacity, harden the orchestration layer, and talk to every early user — your feedback directly shapes what we build next.
If something breaks, confuses you, or is missing, we want to hear about it. Beta users get a direct line to us at hello@volt-test.com.
What's Next
During the beta we're focused on:
- Paid tiers — higher VU counts, longer tests, and parallel runs; pricing is being finalized now and will be announced during the beta
- Scheduled runs — recurring cloud tests on a schedule, on top of the API-key-triggered runs you can already wire into CI today
- Regression detection — automated baselines and pass/fail thresholds, building on the run comparison already in the dashboard
Get Started Today
- Join the waitlist — create your account at volt-test.com/register
- Try it locally while you wait — the PHP SDK Getting Started guide or the Laravel Quick Start takes about five minutes
- Read the cloud docs — so you're ready to go the moment your invite lands: Cloud Mode → or Cloud Execution for Laravel →
Learn More
Cloud documentation
PHP SDK
Laravel package
From the blog
⭐ Star the repository on GitHub: volt-test/php-sdk
💬 Follow updates on X: @VoltTest